

This is the second installation of a blog series in which Mestek Machinery explores the procedures and practices in the fabrication of ducts and duct connectors. You can find part one here and part two here.
How to Join Two Ducts Together
Ducts are commonly joined together by two means – the simple, anchoring Drive Cleat and the reinforcing connector. They are also used in combination, where desirable.
How to Make and Use the Drive Cleat
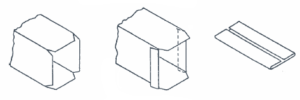
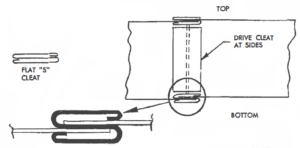
The Drive Cleat is used for anchoring two ducts together-usually on the two narrow sides of ducts that are 180° or less. In most instances, they will be used with the top and bottom reinforcement of Flat “S” Cleat or Standing “S” Cleat section. In fabricating duct and fittings, each section is made up to allow for slightly more than ½” of material, to extend beyond each end of the section. This material is then formed into a 180° hem, or hook. In the example above, the two ducts “X” and “Y” are butted together and the “A” Drive Cleat slipped down over them, locking the ducts together. Drive Cleats can also be pretabbed top and bottom so the tab can be bent around the top and bottom of joint, anchoring assembly into position at final assembly. Drive Cleat rolls are available for the 20, 22, Super 20 Lockformer 18 or 16 gauge, as well as for the Triplex Cleatformer; also available as auxiliary operation with 7 and 9 station Button Punch Snap Lock Machines. Standard rolls will produce Drive Cleats in 20 gauge and lighter material on all of the above machines. The usual practice is to slit or shear stock to 2¾” widths and run either tabbed or untabbed pieces to exact size or random lengths.
Use of the Drive Cleat Cutter Attachment

Mestek Machinery now has available an attachment which eliminates completely the slitting or shearing operation in producing Drive Cleat parts. It converts scrap or “fall-off” material immediately into usable Drive Cleat sections. The first roll is a slitting roll which cuts material into the exact width; the remaining rolls then form the Drive Cleat. The scrap material is deflected upward, away from the machine. The operator then makes subsequent passes with material until it is used up by repeating operations. This converts scrap material into usable pieces, with consequent savings in labor and handling costs. Users of the equipment report that the savings will pay for the attachment in a matter of weeks. The attachment can be used on the following machines: 16, 18, 24 or 20 gauge Button Punch Snap Lock Machines, or Standard Snap Lock equipment. A conversion kit is also available to transform to this revolutionary–concept-any-standard Drive Cleat rolls used on any of the above machines-at a nominal cost.
How to Make and Use Various Connectors
Connectors serve as strengthening members, as well as for connection of two ducts being joined. The most common of these are:
- Flat “S” Cleat-used with Drive Cleats
- Standing “S” Cleat-used with Drive Cleats
- Pocket Lock (or Cliprol)
- Bar or Angle Cleat-used with Drive Cleats
The type of connector used is dictated by the strength required and the type of application. But even this usage is not fixed and varies somewhat with the location or geographical area in which the work is being performed. Such variation is permissible, provided the alternate selection is comparable and the same quality of construction maintained.
Use and Forming of the Flat “S” Cleat
This connector is used in light commercial and industrial applications and predominately in residential heating and ventilating installations. It is quick and easy to install and gives a rigid box-frame construction when used with Drive Cleats on the narrow sides. The Flat “S” is a shape roll-formed on the Cleatformer, using sheets of 22 gauge and lighter. The Mestek Machinery design results in a reinforced hem with ample pocket for joining ducts together top and bottom.