

Although the hydraulic bender is one of the most versatile pieces of equipment in a fabricator’s arsenal, there are some applications that are just not feasible for that machine. For instance, there are several seam types found in HVAC, signage, roofing, and other industries that are more easily completed using roll forming equipment. Let’s take a closer look at a few of these seams and how they’re used in ductwork applications.
Assembling Sections
Pittsburgh Lock
Similar to how a Drive Cleat is designed to have excess material to bend over a duct’s corner, the Pittsburgh Lock seam fits a flanged edge of one panel into a pocket in the Pittsburgh Lock design in the second panel, then the excess material is bent over the first panel’s edge (Fig 1). Unlike cleats, however, the Pittsburgh Lock is not used as a connector between duct sections, but for assembly of the duct section itself.
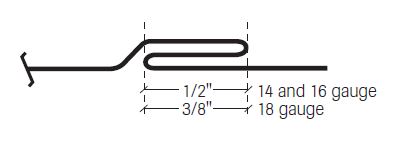
Fig. 1: Pittburgh Lock shape
Snap Lock
The Snap Lock is also designed for the assembly of duct sections, and sees wide usage in roofing construction, too. The unique feature of Snap Lock seams is that the male and female seam are formed and then brought together without any additional hammering. Instead, dimples are punched in the male seam, and these end up securing the second panel in place when the seam is pressed together. Figure 2 depicts the sealed Snap Lock seam.
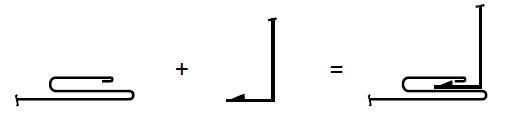
Fig. 2: Male, Female, and combined Snap Lock
Joining Sections
Cleat
Cleats are used to connect two assembled rectangular duct sections, and are comprised of two cleat components, S Cleat and Drive Cleat. S Cleat is used as a connector on the top and bottom of the duct, while Drive Cleat connects the left and right sides. While S Cleats are measured to fit the appropriate width of the duct, Drive Cleats are typically 2” longer than the duct height so that the excess strip can be hammered over the duct corner, securing it in place. You can see examples of the S Cleat and the Drive Cleat in Figure 3.
Fig. 3: Drive Cleat (left) and S Cleat
Standing Seam
The Standing Seam is formed by taking one panel and bending it outward at 90 degrees, resulting in a tab that “stands” straight up. This tab is fitted into the pocket of the second panel, which is formed in a similar standing position, depicted in Figure 4. Once fitted, the seam can be closed by clamping or otherwise applying pressure along the seam. Standing Seams are frequently found in metal roofing applications because the seam design is typically elevated above any water runoff, thus preventing any moisture seepage.
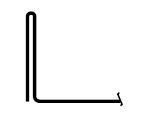
Fig. 4: Standing Seam
Revisit the Sheet Metal Blog for part 2 of Bending Without the Bender, where we’ll review some of the machines fabricators can use to form the seams, connections, and more. Don’t forget to share the go-to seams your shop forms in the comments below!